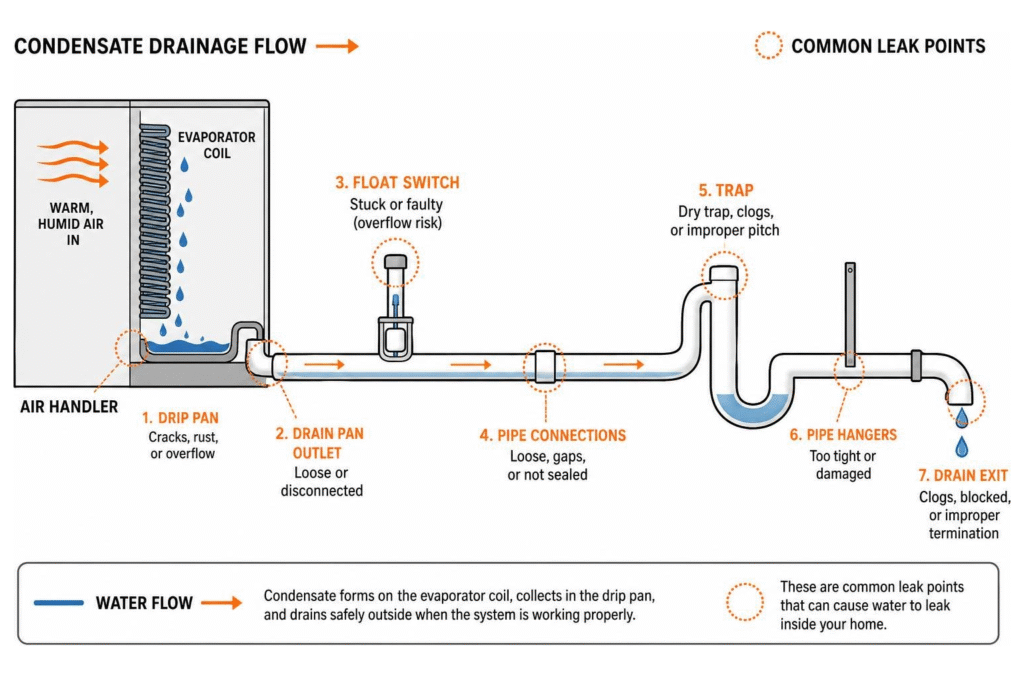
How Air Conditioning Systems Generate Water
Imagine this: it’s a scorching August day in Utah, and instead of cool relief, you discover a puddle forming under your air conditioner inside your home. An AC leaking water is more than just an annoyance; it’s a warning sign that can lead to significant water damage, mold growth, and costly repairs if not addressed quickly. We understand the unique challenges Utah homeowners face with their cooling systems, especially when it comes to maintaining their essential HVAC and plumbing services. This guide is designed to help you understand why your air conditioner might be leaking water inside your Utah home, the common causes behind these frustrating issues, and practical steps you can take for immediate fixes and long-term prevention. Our aim is to equip you with the knowledge to maintain a comfortable and dry living environment.
It might seem counterintuitive for an appliance designed to cool your home to produce water, but it’s a fundamental part of how air conditioners work. The process is rooted in basic physics: condensation. When warm, humid air comes into contact with a cold surface, the water vapor in the air cools down and changes from a gas back into a liquid. This is the same phenomenon you see when a cold glass “sweats” on a hot day.
Inside your air conditioning system, this cold surface is the evaporator coil. As your AC unit pulls warm air from your home across these super-chilled coils, the moisture in the air condenses, forming droplets of water. This process not only cools your home but also dehumidifies it, contributing to a more comfortable indoor environment, especially during Utah’s varied summer conditions.
The amount of condensate produced can be substantial. A typical residential AC system can generate anywhere from 5 to 20 gallons of water per day in humid conditions. Even in Utah, which is often characterized by its arid climate, summer monsoon seasons or localized humidity can significantly increase this volume. All this water needs a proper drainage pathway to be safely removed from your home. The condensate drips into a collection pan, known as the drain pan, located directly beneath the evaporator coil. From there, it’s typically routed through a condensate drain line, often a PVC pipe, which carries the water outside or to a household drain. When any part of this delicate drainage system fails, water can back up and overflow, leading to leaks inside your home.
Primary Causes of Indoor Water Leaks
When your AC starts leaking water inside your Utah home, it’s a clear indication that something in its condensate removal system has gone awry. While the underlying physics of condensation remain constant, several issues can disrupt the efficient drainage of this water. Identifying the specific cause is the first step toward a lasting solution.
Here are the most common culprits behind indoor AC water leaks:
- Clogged Condensate Drain Line: This is arguably the most frequent cause, often due to algae, mold, or debris buildup.
- Dirty Air Filters: A restricted airflow can lead to the evaporator coil freezing, which then thaws and overflows the drain pan.
- Low Refrigerant Levels: Insufficient refrigerant can cause the evaporator coil to become too cold and freeze, similar to a dirty filter.
- Damaged or Rusted Drain Pan: Over time, the pan collecting the condensate can corrode, crack, or rust through, allowing water to escape.
- Improper Installation or Unit Tilt: If the AC unit or drain pan isn’t perfectly level or correctly sloped, water won’t drain efficiently.
If your AC unit is tucked away in a basement, attic, or utility closet, you might not notice a leak immediately. Here are some primary indicators that could signal a hidden indoor AC leak:
- Water stains on ceilings or walls: Especially below an attic-mounted unit.
- Musty odors: A common sign of mold or mildew growth in damp areas.
- Peeling paint or wallpaper: In areas adjacent to the AC unit or condensate lines.
- Soft spots or discoloration on flooring: Around the unit or along baseboards.
- Unexplained increases in indoor humidity: If the AC isn’t effectively dehumidifying.
- A sudden spike in energy bills: As the AC struggles to operate efficiently.
Let’s delve deeper into each of these common causes.
Clogged Drain Lines and Algae Buildup
The condensate drain line is a critical component designed to channel water away from your AC unit. However, over time, this line can become obstructed. The primary culprit is often a slimy buildup of algae, mold, and other debris that thrives in the dark, damp environment of the drain line. Dust, dirt, and even insect nests can also contribute to these blockages.
When the drain line becomes clogged, the condensate water has nowhere to go. It backs up, eventually overflowing the drain pan and spilling into your home. This can lead to significant water damage very quickly, especially considering a unit can produce up to 20 gallons of water daily. One common point of blockage is the P-trap, a U-shaped section in the drain line designed to prevent sewer gases from entering your home. This trap can easily accumulate sludge and debris.
A tell-tale sign of a clogged drain line, beyond visible water leaks, can sometimes be a “popping” or gurgling noise coming from the AC unit. This sound occurs as air tries to pass through the backed-up water in the drain line or P-trap.
How to Fix It: For a minor clog, you might be able to clear it yourself. First, turn off your AC unit at the thermostat and the breaker. Locate the condensate drain line, often a PVC pipe, usually near the outdoor unit or leading to a household drain. There might be a cleanout access point (a T-shaped vent with a cap) near the indoor unit. Remove the cap and try pouring a cup of distilled vinegar (not bleach, as it can damage the coil or pan) down the line to kill algae. Let it sit for 30 minutes, then flush with water.
For more stubborn clogs, a wet/dry vacuum can be highly effective. Attach the vacuum hose to the end of the condensate drain line (often outside) and create a tight seal. Run the vacuum for a few minutes to suction out the clog. Some homeowners also report success by carefully cutting the PVC line (with proper rejoining fittings ready) and blowing air through it towards the exit point. However, if you’re uncomfortable with this, or the clog persists, it’s best to call a professional.
Dirty Air Filters and Frozen Coils
Your air filter is your AC system’s first line of defense against dust, dirt, and allergens. However, a neglected filter can quickly become a major problem. When an air filter becomes excessively dirty, it restricts airflow across the evaporator coil. This reduced airflow has a cascading effect:
- Insufficient Heat Absorption: With less warm air passing over it, the evaporator coil cannot absorb enough heat.
- Temperature Drop: The coil’s temperature drops below its normal operating range.
- Freezing: Moisture in the air that normally condenses into liquid water instead freezes onto the super-cold coil, forming a layer of ice.
This phenomenon is known as a “frozen coil.” As the ice builds up, it further obstructs airflow, creating a vicious cycle. Eventually, when the AC unit cycles off, or the ice becomes too thick, the frozen coil begins to thaw. The rapid melting of a large volume of ice can overwhelm the drain pan, causing water to overflow and leak into your home. This is particularly problematic in Utah homes where AC units might be in basements or attics, leading to hidden water damage.
How to Fix It: The solution here is straightforward: change your air filter regularly. This is one of the easiest and most impactful maintenance tasks you can perform as a homeowner. We recommend checking your filter monthly and changing it every 1 to 3 months, depending on factors like pet ownership, allergies, and local dust levels. During peak cooling seasons in Utah, more frequent changes might be necessary.
If you discover a frozen coil, immediately turn off your AC unit and switch the fan to “ON” (not “AUTO”). This will allow the fan to run and help melt the ice without the compressor running. Place towels around the unit to catch melting water. Once the coil has completely thawed (which can take several hours), replace the dirty filter with a clean one. Then, you can restart your AC. If the coil refreezes quickly, it indicates a deeper issue that requires professional diagnosis.
Low Refrigerant and Damaged Drain Pans
Two other significant causes of AC leaks are related to the system’s core components: refrigerant levels and the drain pan itself.
Low Refrigerant Levels: Refrigerant is the lifeblood of your AC system, responsible for absorbing heat from your home and releasing it outside. If your system has a refrigerant leak, the pressure inside the evaporator coil drops. This lower pressure causes the coil to get excessively cold, similar to the effect of a dirty air filter. When the coil becomes too cold, moisture in the air can freeze onto it, leading to ice accumulation. As with a dirty filter, this ice eventually thaws, overwhelming the drain pan and causing leaks.
Beyond leaks, low refrigerant is a serious issue because it indicates a leak in the sealed system, which should never happen unless there’s damage. It also significantly reduces your AC’s efficiency, causing it to work harder, consume more energy, and ultimately fail prematurely. In Utah’s climate, where AC units are heavily relied upon during hot summers, an inefficient system due to low refrigerant can lead to uncomfortable indoor temperatures and high utility bills.
How to Fix It: Unlike a dirty filter, low refrigerant is not a DIY fix. Adding refrigerant without addressing the underlying leak is a temporary band-aid and a waste of resources. If you suspect low refrigerant (signs include poor cooling, hissing sounds, or ice on the coil even with a clean filter), you need to call a certified HVAC technician. They will locate and repair the leak, and then properly recharge the system to the manufacturer’s specifications.
Damaged or Rusted Drain Pans: The drain pan, located directly beneath the evaporator coil, is designed to catch all the condensate water. Most modern drain pans are made of durable plastic, but older units, particularly those between 12 and 15 years old, may have metal pans that are susceptible to rust and corrosion. Over time, constant exposure to water can cause these pans to rust through, crack, or develop pinhole leaks. When this happens, water will seep directly through the damaged pan and into your home instead of flowing into the drain line.
How to Fix It: If your drain pan is cracked or rusted, it needs to be replaced. This is generally not a DIY task, as it often requires disassembling parts of the indoor AC unit to access and remove the old pan and install a new one correctly. A professional HVAC technician can assess the condition of your drain pan and replace it if necessary. They can also inspect for any structural issues or improper installation that might contribute to pan overflow.
Common Causes of AC Leaks and the Role of Professional HVAC and Plumbing Services
While many AC leak issues stem from common problems like clogged drain lines or dirty filters, some situations demand the expertise of a professional. Understanding when to call in the pros can save you from more extensive damage, costly repairs, and prolonged discomfort.
Professional HVAC and plumbing services offer expert diagnostics, ensuring that the root cause of your AC leak is accurately identified. They have the specialized tools and training to clear stubborn line blockages, address refrigerant leaks, and perform systemic maintenance that goes beyond basic homeowner tasks. This comprehensive approach helps protect your property from water damage and ensures your AC system operates efficiently and reliably. For homeowners in Utah, having access to reliable HVAC and plumbing services is crucial for maintaining a comfortable and safe home environment. Whether it’s a minor clog or a complex system issue, professional help ensures that your cooling system is in optimal condition. You can learn more about comprehensive HVAC and plumbing services for your home by visiting reputable providers.
Comprehensive HVAC and Plumbing Services for Persistent Water Leaks
When DIY fixes aren’t enough, or if you’re dealing with recurring leaks, a professional technician provides a deeper level of service:
- Advanced Line Flushing: Professionals use specialized equipment, such as powerful vacuums or pressurized nitrogen, to thoroughly clear even the most stubborn clogs, including those deep within the P-trap or main drain line.
- Condensate Pump Issues: If your AC unit is located in a basement or an area where gravity can’t effectively drain the condensate, it relies on a condensate pump to push the water uphill to a drain. If this pump fails, water will back up. Technicians can diagnose and replace faulty pumps.
- Drain Snaking and Inspection: For very long or complex drain lines, a technician might use a drain snake or even a small camera to inspect the line for blockages or damage that isn’t visible from the access points.
- Refrigerant Leak Detection and Repair: As mentioned, low refrigerant requires professional attention. Technicians use leak detectors to pinpoint the exact location of a refrigerant leak, repair it, and then properly recharge the system. This ensures the system is sealed and operating at peak efficiency.
- Evaporator Coil Cleaning: Over time, evaporator coils can accumulate dirt and grime, even with regular filter changes. This buildup can impede heat transfer and sometimes contribute to freezing. Professionals have specialized cleaners and equipment to thoroughly clean the coils without damaging them.
- Proper Installation Checks: An HVAC technician can verify if your unit is properly installed, ensuring the indoor unit and drain pan are level and sloped correctly for optimal drainage.
Long-Term Preventive Maintenance Through Integrated HVAC and Plumbing Services
The best way to address AC leaks is to prevent them from happening in the first place. Regular maintenance is key, and an annual tune-up by a qualified technician is invaluable, especially in a state like Utah where AC units work hard through hot summers.
- Annual Tune-Ups: During an annual maintenance visit, a technician will perform a comprehensive check of your entire AC system. This includes inspecting and cleaning the condensate drain line, checking refrigerant levels, examining the drain pan for signs of wear or damage, and cleaning the evaporator coils. This proactive approach catches minor issues before they escalate into major leaks or breakdowns.
- Safety Switches: Many modern AC units, especially those installed in attics or basements, are equipped with float switches. These devices are installed in the drain pan or condensate line and automatically shut off the AC unit if water levels get too high, preventing an overflow. During maintenance, a technician will test these safety switches to ensure they are functioning correctly.
- Pan Inspections: Technicians will thoroughly inspect the drain pan for any signs of corrosion, cracks, or blockages. For older units, they can advise on the expected lifespan of the pan and recommend replacement if it’s nearing the end of its service life. An old drain pan can rust through and crack, so water leaks onto the floor instead of down the drain. AC units between 12 and 15 years old may need a new pan.
- Coil Cleaning: Beyond just checking the filter, professional coil cleaning ensures the evaporator coil is free of dirt and debris, promoting efficient heat exchange and preventing ice formation.
- Filter Replacement Reminders: While homeowners are responsible for routine filter changes, your HVAC provider can offer reminders or even include filter replacement in their service plans, ensuring this crucial step isn’t overlooked.
By investing in regular, professional HVAC maintenance, you’re not just preventing leaks; you’re extending the life of your system, improving its efficiency, and ensuring consistent comfort in your Utah home for years to come.
Immediate Steps to Take When Your AC Leaks Indoors
Discovering an AC leak inside your home can be alarming, but acting quickly can significantly minimize potential damage. Here’s a step-by-step guide on what to do immediately:
- Turn Off the AC System: This is the most crucial first step. Go to your thermostat and switch your system from “Cool” to “Off.” If water is actively dripping, also switch the fan setting from “Auto” to “Off” to prevent further condensation. For an added layer of safety, consider turning off the power to the AC unit at your home’s electrical breaker panel. This prevents any electrical hazards and stops the unit from cycling on and potentially worsening the leak.
- Locate the Leak Source (If Safe): Carefully try to identify where the water is coming from. Is it dripping directly from the indoor unit, overflowing from the drain pan, or coming from the condensate line? This information will be helpful when troubleshooting or speaking with a technician.
- Contain the Water: Place buckets, towels, or other absorbent materials directly under the leak to catch the water and prevent it from spreading. The goal is to protect your flooring, walls, and furniture from water damage.
- Begin Water Extraction: Once the immediate leak is contained, start removing any standing water from the affected area. Use towels, a wet/dry vacuum, or a mop. The quicker you remove the water, the less chance it has to cause long-term damage or promote mold growth.
- Protect Nearby Materials: If the leak has affected drywall, carpeting, or wooden baseboards, try to dry these areas as much as possible. You might need to move furniture away from damp spots. Open windows and use fans or dehumidifiers to increase air circulation and aid in drying.
- Inspect Your Air Filter: While waiting for a professional or before attempting a DIY fix for a clogged line, check your air filter. If it’s visibly dirty, replace it. A dirty filter can cause coils to freeze, leading to leaks when they thaw.
- Contact a Professional (If Necessary): If you can’t identify the cause, the leak is significant, or you’re uncomfortable attempting a DIY fix, call a qualified HVAC technician immediately. Explain the situation clearly, including the steps you’ve already taken.
Here’s a list of emergency items for cleaning AC water leaks:
- Buckets or large containers
- Absorbent towels or rags
- Wet/dry vacuum
- Mop and bucket
- Fans for air circulation
- Dehumidifier (if available)
- Flashlight (for inspecting dark areas)
- Rubber gloves
Water damage can also lead to mold growth within 24 to 48 hours in the right conditions, so prompt action is essential to protect your home and your family’s health.
Frequently Asked Questions About Indoor AC Leaks
Homeowners often have specific concerns when faced with an AC leak. Here, we address some of the most common questions to provide clarity and guidance.
Why is my AC leaking water inside and making a popping noise?
When your AC unit is leaking water and also producing a popping or gurgling noise, it’s a strong indicator of a clogged condensate drain line or a problematic P-trap. The popping sound is typically caused by air bubbles attempting to push through the backed-up water in the drain line, creating a “gurgling” or “popping” effect as they escape. This is a common symptom of water backup due to an obstruction.
Less commonly, but more seriously, water backing up could potentially come into contact with electrical components, causing a popping sound if there’s a short circuit. However, the more frequent cause is the movement of condensate against air in a restricted pathway. It signals that the water isn’t draining freely, and pressure is building up. Addressing the drain line clog, as discussed earlier, is usually the solution to both the leak and the noise.
See also: Why Legal Representation Matters in Family Law Conflicts
How quickly can indoor AC leaks lead to mold growth?
The speed at which mold can grow after an indoor AC leak is surprisingly fast. Under the right conditions—which include moisture, a food source (like drywall, wood, or fabric), and a suitable temperature—mold can begin to grow within 24 to 48 hours.
This rapid onset highlights why immediate action is crucial when you discover an AC leak. Even seemingly small leaks, if left unaddressed, can create damp environments that are ideal for mold spores to colonize and spread. Mold not only causes unsightly stains and musty odors but can also lead to health issues, particularly for individuals with allergies, asthma, or compromised immune systems. It can also cause structural damage to your home over time. Therefore, cleaning up standing water and thoroughly drying affected areas within the first day or two is paramount to preventing mold proliferation.
How often should air filters be changed to prevent water leaks?
Changing your air filter regularly is one of the simplest yet most effective preventive maintenance tasks you can perform to avoid AC water leaks. We recommend checking your air filter monthly and changing it every 1 to 3 months.
The exact frequency depends on several factors:
- Usage: During peak cooling seasons in Utah (typically summer), your AC works harder, and filters accumulate debris faster.
- Pets: Homes with pets tend to accumulate more dander and hair, requiring more frequent changes.
- Allergies/Asthma: If anyone in your household suffers from respiratory issues, more frequent changes ensure better air quality.
- Dust Levels: Construction nearby or living in a particularly dusty area can necessitate more frequent changes.
- Filter Type: Some higher-MERV filters, while more efficient at trapping particles, can restrict airflow more quickly when dirty.
You should change your filter if it looks dirty like the one on the right. A dirty filter restricts airflow, causing the evaporator coil to freeze, which then thaws and overflows the drain pan, leading to leaks. Keeping your filter clean ensures proper airflow clearance, protects your coil from freezing, and maintains your AC’s efficiency.
Conclusion
An AC leaking water inside your Utah home is a problem that demands your attention. From the natural process of condensation to the various mechanical and maintenance failures that can lead to overflow, understanding the causes is the first step toward a dry and comfortable home. Whether it’s a clogged drain line, a dirty air filter leading to a frozen coil, low refrigerant, or a damaged drain pan, each issue has a specific remedy.
We’ve emphasized the importance of prompt action—immediately shutting down your system and containing the water—to prevent significant damage and the rapid onset of mold. We also highlighted the critical role of routine service and professional intervention for complex issues or persistent leaks. By taking proactive steps like regular filter changes and annual professional tune-ups, you can prevent most AC water leaks, maintain system efficiency, and ensure your home remains a cool, dry sanctuary, even on the hottest Utah days. Don’t let a small drip turn into a major headache; stay vigilant, act quickly, and invest in the long-term health of your HVAC system.